General
- CloudAlarm is built using ASPSecurityKit which is by far the best zero-trust security framework for web apps and services out there. All requests go through the multi-stage security pipeline and every request that requires access to protected data, goes through ASK's activity-data authorization (ADA) checks, ensuring absolute isolation of customers data from each other.
- The service is hosted on Azure managed cloud services with no remote access to the servers even for the development team.
- Access to the database is protected by strong user credentials and IP firewall.
- The site server(s) are behind CloudFlare's DNS/DDOS protection.
- The site is only accessible using secure http protocol.
At the moment CloudAlarm provides full support for Microsoft Azure to create both budget and resource alarms.
AWS support is planned to be rolled out next. Please enter your email so we can notify you when the AWS integration completes.
Or, you can sign up and be part of the early bird group which will gain lifetime discount upon conclusion of beta and introduction of pricing tiers.
AWS support is planned to be rolled out next. Please enter your email so we can notify you when the AWS integration completes.
CloudAlarm is in beta; however, it doesn't mean that you're getting an inferior quality product. An important purpose behind keeping it in beta is to learn from customers their use cases for alarms and incorporate them into the service, without customers requiring to commit on a payment plan.
Feel free to send us details at [email protected].
Pricing
In order to provide predictable service quality to all of our beta users, we have following temporary restrictions:
- Individual users can connect maximum two subscriptions. No such restriction on business/organization users – you can connect as many subscriptions you want.
- Individual users can create maximum five alarms per subscription while for business/organization users, it's maximum ten per subscription.
Connecting Azure subscriptions
Install the app into the tenant
Before you can connect an Azure subscription, you need to install the CloudAlarm Azure App into the Azure Active Directory (AD) tenant which holds that subscription.
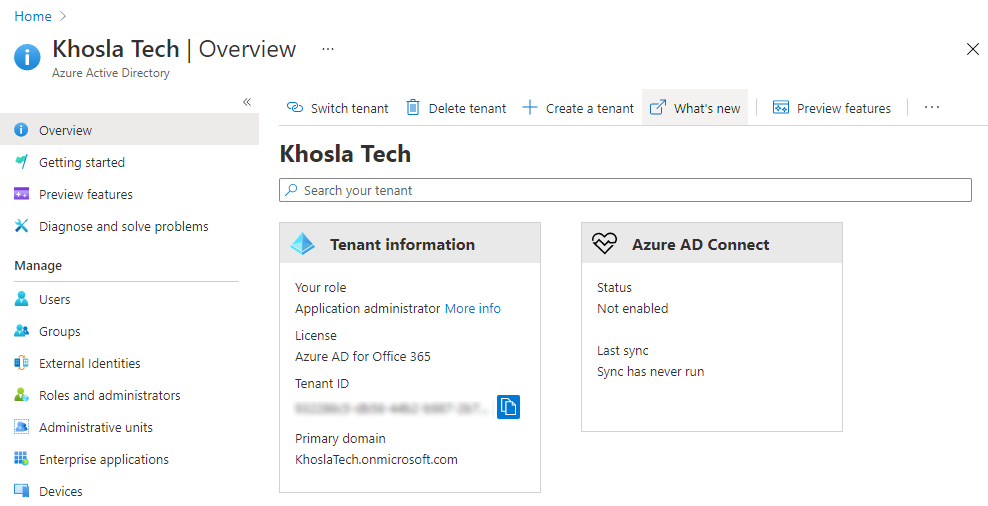
- Consenting with personal Microsoft Account (e.g. [email protected]) doesn't work. So if you sign in to Azure Portal with a personal Microsoft account , you first need to create an Azure AD tenant user and grant it at least the Application administrator or a higher role. In the following steps, you should always sign in with this tenant user and not with your personal Microsoft Account.
- Visit Subscriptions page.
-
Click on the 'Onboard New Tenant' button above the second grid (Tenants grid) and click on Ok on the popup that appears.
Note: as instructed on the popup, if you have multiple Azure accounts and you want to be able to choose one of them, you should use a private (incognito) window as Azure can otherwise just opens up the install application page using the default account which you recently signed in with. Just open a new private (incognito) window and sign in to CloudAlarm first and follow these steps. - If you're presented with sign in, make sure you specify the AD tenant user's credentials as mentioned above.
- On the Permissions requested page, select the Consent on behalf of your organization checkbox and click on the Accept button.
Setup access to subscriptions
Upon successful app installation, you're taken to step two wherein you need to grant read-only access to one or more Azure subscriptions inside the same AAD tenant, to the CloudAlarm app.
- First, on a new browser tab/window, follow these steps to grant Reader role to CloudAlarm app for each subscription you want to monitor. (You can start with one subscription and can grant access to more subscriptions later.)
- Once access is granted, switch back to CloudAlarm's 'Setup access to subscriptions' page and click on the Load & Validate Subscriptions button.
- Upon success, you should see a message that states the number of subscriptions loaded. A validation of permissions also takes place behind the scene but you can start creating alarms for the loaded subscriptions.
- In case of an error, please correct the issue as instructed and you can try the above step again from Subscriptions page. Just click on the Setup Subscriptions button for the same tenant inside the second grid.
-
Visit the Azure Active Directory page.
-
Select the Users tab.

- Click on 'New User'.
-
Select 'Create user' option and under Identity section, enter a unique username and select the domain. Also enter the name of the user and choose appropriate password option you prefer.

-
Under Groups and roles section, click on 'User' and select 'Application administrator' from the Directory Roles popup.

-
Click on 'Create' to create the user.

-
Visit the azure subscriptions page.

-
Click on the desired subscription, and on the subscription page, select 'Access Control (IAM)' tab.

- Click on 'Add', and then choose 'Add role assignment' menu option.
- In the 'Role' dropdown, select 'Reader'.
- In the 'Assign access to' dropdown, select 'User, group or service principal'.
- In the 'Select' edit box, type 'CloudAlarm', and then select the application in the search results grid.
-
Click on the 'Save' button to assign the 'Reader' role to CloudAlarm app on the subscription.

If you have granted Reader or higher role, the validation should succeed without a problem. However, if it fails for any reason for a subscription, you can re-trigger validation using the Validate button available in that subscription's row on the
Subscriptions page.
Click on the Reload Subscriptions button for the tenant inside the tenants grid on the Subscriptions page.
Then, follow steps mentioned under 'Setup access to subscriptions' section of the QA How can I connect an Azure subscription with CloudAlarm?
Yes, just click on the Delete button available on every row inside both the subscriptions and tenants grids on the Subscriptions page.
Alarms
Presently, three alarm types are supported: budget, new resource and
delete resource. Alarms related to scaling up/down existing resources is planned.
If you have a need for any other kind of alarm, feel free to send us details at
[email protected].
Budget alarms
The budget alarms let you monitor spending at the level of subscription/resource group and raise alerts if your daily spend is estimated to exceed your expected monthly budget. Azure also does something similar with budget alerts but there's a key difference.
Azure requires you to specify a threshold value – a percentage of the budget – and triggers an alert only when your consumption hits that value. For instance, suppose you set a budget of $1000 and a threshold value as 50%. Now suppose that someone creates a resource accidentally with a wrong tier – say an expensive SQL database – that has a cost of $50 per day while the need and approval was for a $1 per day tier. You also have other resources costing $30 per day so total cost is now $80 per day.
With Azure budget actual-based alerts, you'll likely get notified on the 8th day by which time you have consumed 50% ($560) of your budget, of which $350 is the cost of that database alone instead of $7.
With Azure budget forecast-based alerts, you'll still get notified after a few days again when you've consumed 50% of your budget as per the forecasted cost for the month. We're not privy to the exact algorithm that calculates forecast cost, but in either case the important point is that you need to have consumed a threshold or percentage of your budget amount before you get notified.
With CloudAlarm, you don't need to specify a threshold value. You only specify what's your expected monthly budget and CloudAlarm does the following on every day:
- Determine already consumed amount based on first day of the current billing period up to yesterday (Azure provides usage/consumed cost details by resources only until the prior day of today).
- Determine latest daily cost as per the last day consumption.
- Multiply daily cost with remaining days of the billing period and add already consumed amount.
- If the total as per prior step exceeds the budget amount specified, raise an alert.
For the same scenario of $80 being spent per day discussed previously, following the above calculation method, CloudAlarm will alert you on the 2nd day itself by which time you've spent only $50 (instead of $350 as in case of Azure budget alerts) on the wrong tier of SQL database.
CloudAlarm has to wait for a day because Azure doesn't provide a way to know the actual cost for a given resource, until that resource has been consumed for a day. However, with new resource alarm you can even bypass this limitation by setting up alarms to notify you if a resource is created in tiers you don't expect to use. resource alarms are run every few minutes so you'll not even consume few dollars for the same database scenario and you'll get notified of the mistake. You can immediately amend the tier and literally save yourself almost the entire cost – and a charge of $2 or so for an hour would be the cost incurred instead of hundreds of dollars if you had relied on Azure budget alerts.
Budget alarm relies on Azure's usage details API to know the cost for resources in your subscription. At the moment we don't use retail pricing API for this purpose because the actual cost can vary due to discounts and other reasons from retail pricing. The usage API gives consumption data only up to the prior day so there's no direct way to get the actual cost of resources created today. Azure budget alerts also rely on the same API as far as we know.
At a high-level, following is the process a budget alarm goes through:
-
Depending on the level – subscription or resource group at the moment – configured for the alarm, get a filtered list of applicable resources from Azure usage details API response.
Note: we usually invoke usage API only once per subscription per day and caches the response if successful. Any subscription or resource group level alarms are then served from this cached data. - Determine already consumed amount based on first day of the current billing period up to yesterday (as explained above, Azure provides usage/consumed cost details by resources only until the prior day of today).
- Determine latest daily cost as per the last day consumption.
- Multiply daily cost with remaining days of the billing period and add already consumed amount.
- If the total as per prior step exceeds the budget amount specified, raise an alert.
Make sure you have connected the subscription for which you want to create a budget alarm. Then, follow these steps:
- Navigate to Alarms page from the top menu.
- Click Create new alarm.
- Choose 'Budget Overrun' from the Alarm Type dropdown.
- Enter a unique name for this alarm.
- Choose a subscription. If you want alarm with same budget for all connected subscriptions, you can even choose the default 'All' option. However, presently selecting 'All' for subscription creates separate budget alarm for each connected subscription.
- Choose a resource group if you want to setup alarm to monitor spending only for a particular resource group; otherwise, let it be 'All'.
- Enter monthly budget amount in the same currency you're billed by Azure for the selected subscription.
- Optionally, choose number of reminders you want to receive. A reminder is the same alert sent again after the specified interval, so that you can be reminded in case you missed or forget to take action on the original alert. If you don't select a value here, no reminder will be sent.
- Optionally, choose an interval for reminder.
An alarm email is sent to the owner's email address as well as to all the team users who have access to the associated subscription.
At the moment budget alarm notification, if raised, would arrive in your inbox after 08:00 AM as per the selected timezone for the subscription (which defaults to the timezone as per your profile). You can change this timezone on the Subscriptions page. Reason for this schedule is to have an alert email (if any), be as close as possible to the top of your inbox when you start work so you can notice and take action to prevent unexpected spending immediately.
No, a budget alarm is only evaluated once per day as mentioned in QA How does budget alarm work? At the moment any change in the alarm (including budget amount) is considered only during the next evaluation.
Resource alarms
Make sure you have connected the subscription for which you want to create a new resource alarm. Then, follow these steps:
- Navigate to Alarms page from the top menu.
- Click Create new alarm.
- Choose 'New Resource' from the Alarm Type dropdown.
- Enter a unique name for this alarm.
- Choose a subscription. If you want exactly same alarm for all connected subscriptions, you can even choose the default 'All' option. However, presently selecting 'All' for subscription creates separate new resource alarm for each connected subscription.
- Choose a resource group if you want to setup alarm to monitor resource creation only for a particular resource group; otherwise, let it be 'All'.
- Choose a service category if you want to monitor only a particular type of services. A non-all selection here will enable other options such as services and tiers.
- Choose a particular service if you chose a category previously.
- If you want to monitor resource creation based on a condition related to pricing tier, choose an appropriate operator followed by the appropriate tier(s). Tiers in the dropdown are sorted in ascending order based on cost (as per Azure retail pricing), so the least expensive tier is at the top.
- Optionally, choose a region if you want to monitor resource creation only in a specific region with this alarm.
An alarm email is sent to the owner's email address as well as to all the team users who have access to the associated subscription.
Make sure you have connected the subscription for which you want to create a delete resource alarm. Then, follow these steps:
- Navigate to Alarms page from the top menu.
- Click Create new alarm.
- Choose 'Delete Resource' from the Alarm Type dropdown.
- Enter a unique name for this alarm.
- Choose a subscription. If you want exactly same alarm for all connected subscriptions, you can even choose the default 'All' option. However, presently selecting 'All' for subscription creates separate delete resource alarm for each connected subscription.
- Choose a resource group if you want to setup alarm to monitor resource deletion only for a particular resource group; otherwise, let it be 'All'.
- Choose a service category if you want to monitor only a particular type of services. A non-all selection here will enable other options such as services and tiers.
- Choose a particular service if you chose a category previously.
- If you want to monitor resource deletion based on a condition related to pricing tier, choose an appropriate operator followed by the appropriate tier(s). Tiers in the dropdown are sorted in ascending order based on cost (as per Azure retail pricing), so the least expensive tier is at the top.
- Optionally, choose a region if you want to monitor resource deletion only in a specific region with this alarm.
An alarm email is sent to the team users email address as well as to all the team users who have access to the associated subscription.
Resource alarms are usually evaluated every five minutes as of this writing. This means that if the resource is fully created on Azure by 10:00 AM, and if a new resource alarm is setup to monitor such a resource creation, you should get an alert within next 5-6 minutes. However, there could be a delay in case we're experiencing heavy activity in the jobs that evaluate these alarms.
Users and Team
Businesses and organizations get team feature to setup additional users and delegate alarm management to them. As an admin you can add, remove or suspend users of your team, change their password or even block password (require user to reset password to login). Built based on ASPSecurityKit's user management source package feature.
- Visit the team page and click on the Subscriptions button available toward the right side on the user's record for whom you want to manage delegation.
- To delegate a subscription, click New subscription button above the new nested grid that has appeared under the user's record.
- If you want to delegate all current and future subscriptions to this user, choose 'All' from the dropdown; otherwise, choose one subscription you want to delegate, and then click Save button.
- Repeat above steps to delegate more subscriptions
- If you have chosen 'All' you can't add individual subscriptions. But you always have an option to delete any delegated record (whether 'All' or a specific subscription) using the Delete button available toward the right side in every record.
Yes, users with delegated rights on a subscription will also receive all alerts related to alarms for that subscription, regardless of whether or not such alarms were created by them.